
Hey, today we are going to talk about Microsoft Word. Sometimes while making a document on Microsoft Word, you have to separate your document. So how to insert a horizontal line in word to separate your document.
Microsoft Word has many types of Horizontal lines, each type of line has different names and different uses. In this article, I am going to tell you about the most important Horizontal lines. Also, I am going to tell you some easy ways to add the horizontal line in a Word document with very shortcut tricks. There are a couple of different ways you can create horizontal lines and verticle lines in Microsoft Word.
Let start with the simple and primary method to insert the separated in your Word as below –
How to insert Horizontal line in word?
First of all, I want to introduce you to the primary method to add horizontal lines in Word.
Horizontal line using Borders tools
You can add horizontal lines by using the Borders tool in the Paragraph segment in the Home tab in Microsoft Word. To go ahead with this tool follow the steps below –
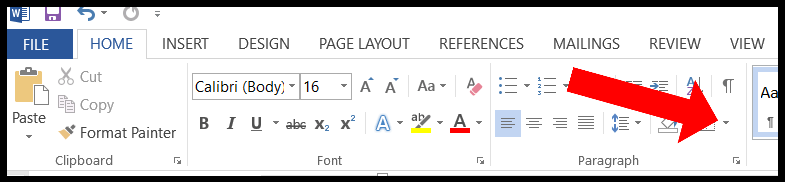
Step 1 – Go to Home tab in MS Word.
Step 2 – Now move to Paragraph and go to Borders tool.
Step 3 – Click on the arrow button, it will open the dropdown.
Step 4 – Select the line which you have to insert and click on it.
The type of line depends on where you want to use it. Don’t use the Bottom line and Top line as a Separator line. As I have told you each line used for different functions. If you want to separate your document paragraphs you need to use the Horizontal line. This is the line that is not a paragraph border.
Edit Horizontal line
You can also customize the line. When you insert the Horizontal line, double click on it. It will open the customization options. The customization options include color, alignment, height, and width. It means you can change the line color according to your document. Also, you can customize its alignment as per your requirement. The width should be always 100% because it looks professional. My personal recommendation is don’t use thick lines.
Horizontal line using Shapes
This is the unofficial method to add the line to Word. Why I am telling it unofficial? Because this is not the actual way to add a horizontal line. The main use of this way is to add shapes to your documents. But you can also draw the horizontal line. Let see how to make it happen –
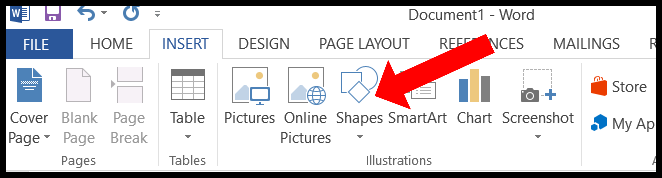
Step 1 – Go to Insert tab in your MS Word.
Step 2 – Go to shape and click on it.
Step 3 – Select the straight line there.
Step 4 – Draw the line where you have to add it.
This is an amazing but unofficial way for adding Horizontal line in Microsoft Word. I don’t recommend you to use this method. Lines drawn using this method can sometimes be slanted.
How to insert Horizontal line in Word using tricks?
Now you can easily insert the Horizontal line using the above primary methods. But now I am going to tell you some tricks by using that you can add the line in just a few seconds. Let see how to make it happen as below.
If you are willing to add the Horizontal line using short trick follow the steps below –
Step 1 – Go to Microsoft Word.
Step 2 – Type the Hyphen four times and heat the Enter button.
You can see, it generates a Horizontal line automatically. This is the trick and you can use it to insert many types of lines. I am giving you a table of signs with their name, you can insert the different types of lines using these signs. Just as it was done for the hyphen, it has to be done here. Just type the character four times and press the Enter button.
| Hyphens | ———— |
| Underscores | __________ |
| Equal Signs | ====== |
| Asterisks | ********** |
| Hashtags | ####### |
| Tildes | ~~~~~~ |
If you want to add the simplest horizontal line, use Hyphens (—-) to insert the line. On the other hand, by using Underscores ( ____ ) you can insert a little thick line. Now if you want to insert the line which looks like an elongated equal sign, you need to use an equal sign (====). The most important dotted line can be inserted using Asterisks (****).
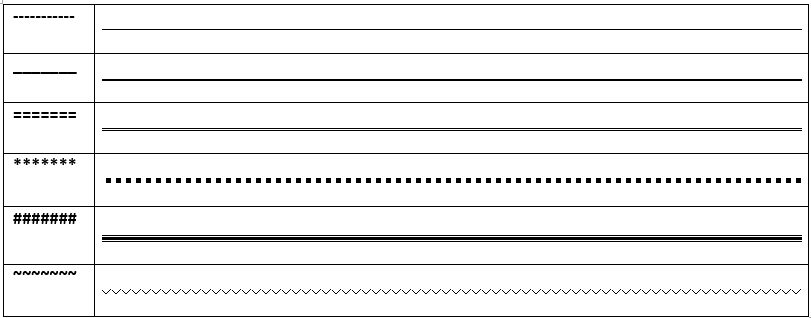
Look at the image, you can see there are 6 different types of line which is generated by pressing different sign’s buttons. Upper two line types are simplest. The line generated using underscores is thicker than line generated using hyphens. The line made using hashtags is looks like extraordinary and thick. This line is rare, people rarely use it because maximum people don’t know this line. The last line is used in books. it is also rare. Now you understand and have got the idea about lines. You also know which sign is used to insert what kind of line.
Also Read –
- How to insert a watermark in Microsoft Word?
- Fix – Product Activation Failed in Microsoft Word.
- How to use YouTube branding Watermark?
Conclusion
These are the way to add Horizontal lines in Microsoft Word. Now you know the primary method to insert the line with shortcut tricks. By using these shortcut tricks you can add the lines very easily. Please let me know if you know of a method other than the ones in this article.
I hope you learned something new from this article. If you like this article don’t forget to share it with your friends. If you have any questions feel free to ask me.
Thanks for reading.