Robots.txt is a very important setting one to find yourself in the search engine. In blogger, it is known as custom robot.txt. You can set it according to you. Today I am going to tell you what is robots.txt for blogger.
Before starting this article I am suggesting you to the previous article because I had discussed there how to add Custom Robots Header Tags Settings for blogger?
I hope you read that post first. Readers who have already read that post, they realized with the importance of search engine. Today I am telling something like my previous post. It will also help you to grow the visibility in search engine.
In this article, I am happy to show you this in deep. I am also telling about its use and benefits. How to add custom robots.txt file in blogger this is our final task of this article. Now I am going to start the tutorial –
What is Robots.txt for Blogger?
Robots.txt is basic coded lines which are available only in few words in few lines. This file will be saved indirectly to the server of your website or blog. It is a command for search crawler that how to index and crawl your blog or website in the list of search results.
Any web page of your blog which you do not want to publish in public then you can restrict that webpage from the web crawlers. Its effect that webpage will ignore by search crawler means it will not index in search results. Some pages like your labels pages, demo pages or any other useless page are not to show in search results.
Before the scanning of web pages, Search crawlers always scan the robot.txt file first. Every blog already has their robots.txt file which is the default one file. The file looks like this –
User-agent: Mediapartners-Google
Disallow:
User-agent: *
Disallow: / search
Allow: /
Sitemap: https://example.blogspot.com/feeds/posts/default?orderby=UPDATED
Explanation of Robot.txt
The robot.txt is code and divided into three parts. First, we have to know about each of them and then we will be able to learn how to add it to our blog server below.
User-agent – Mediapartners-Google
This is the robot of Google AdSense it helps to serve good quality ads on your blog. If you are using the Google AdSense ads on your blog then don’t touch this code. If you are not using the Google AdSense on your blog then also leave it as it is.
User-agent – *
This is a robot which is marked as an asterisk (*) to all robots. If your blog is in default settings then labels links from your blog will be restricted to scan or indexed by crawlers then its results into ignoring your labels link to index in search engine.
Disallow – / search
That means the links which have the keyword will be ignored search after the domain name. Observe the example this is a link and attached with label page named BLOG.
https://www.examle.blogspot.com/search/label/blog
If you remove Disallow – / search code from the above code then crawlers will be able to access our whole blog to index and crawl all of its content and web pages.
Allow – / this is a code related to our blog’s Homepage that means web crawlers can crawl and index our blog’s homepage.
How to disallow Particular Post?
Now if you want to remove or do not want to index the page on search result then just add this code in the above code.
Disallow: /yyyy/mm/post-url.html
Now the yyyy is referred to year. This represents the year of publishing the post.
The mm is the month of the year when you have published the post.
It will easily get you on the post URL. Suppose the URL is –
https://example.blogspot.com/2018/11/custom-robots-header-tags.html
Then paste only from /2018/11/custom-robots-header-tags.html below.
Now code look like –
Disallow: /2018/11/custom-robots-header-tags.html
Just copy the URL and remove the blog name from it and insert it in the above code.
How to disallow Particular Page?
Now if you want to remove or do not want to index the page on search result then just add this code in the above code.
Disallow: /p/page-url.html
Now the / p is referred to the page. This represents the post is not post it is a page of the above blog.
It will easily get you on the page URL. Suppose the URL is –
https://example.blogspot.com/p/contact-us.html
Then paste only from /p/contact-us.html below.
Now code look like –
Disallow: /p/contact-us.html
Just copy the URL and remove the blog name from it and insert it in the above code.
Sitemap
http://example.blogspot.com/feeds/posts/default?orderby=UPDATED
This code refers to our blog’s sitemap which is also an important one. We can easily optimize our blog’s crawling rate. A extra tip for you that you must have submit sitemap to search console.
When the search crawler crawls our blog then first it will go to the robot.txt and we have pasted the sitemap URL their so it gets the path to scan the sitemap also. Web crawler will easily crawl our blog’s all posts and content then. So that by this setting chances increase to crawl the all post and content without any problem facing.
Note: This is a default sitemap and it will order to web crawlers to crawl only the recent 25 posts. If you want to increase the number of links in your sitemap replace the default sitemap with the following one. It will work for the first 500 recent posts.
http://example.blogspot.com/atom.xml?redirect=false&start-index=1&max-results=500
If you have 500 and more then 500 posts in your blog then you should add two sitemaps like below –
http://example.blogspot.com/atom.xml?redirect=false&start-index=1&max-results=500
&
http://example.blogspot.com/atom.xml?redirect=false&start-index=500&max-results=1000.
Adding Custom Robots.txt for Blogger
This is the important part of the post which is adding the below information into a blogger. Let’s start the tutorial –
Step 1 – Go to your blogger account.
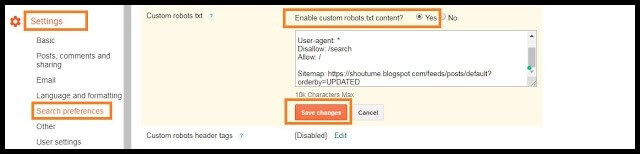
Step 2 – Go to Settings >> Search Preferences >> Crawlers and indexing >> Custom robots.txt.
Step 3 – Click on edit option and then click on “Yes”.
Step 4 – Now paste your robots.txt file code in the box.
Step 5 – Click on Save Changes button.
Congratulations you have completed successfully.
How to Check Your Robots.txt for blogger & WordPress?
You can check this file on your blog by adding /robots.txt at the end of your blog URL in any browser. For example –
http://www.example.blogspot.com/robots.txt
Once you visit the robots.txt file URL you will see the entire code which you are using in your custom robots.txt for blogger.
Conclusion
We have completed today’s tutorial of how to add the custom robots.txt file to your blogger. I am giving this knowledge to you by making the article. I am trying my best to inform you. Sometimes you get some doubt and you do not share it with others.
Tell me if you have any doubt and query. Do not put any other code in the robot.txt section of your blogger account without the knowledge. It will ignore to index your blog on the search engine. Be careful about it.
Thanks for reading my article. If you like this article then please share it with your friends. Spread me everywhere.