
In a blogger, adding a contact us form is a boring task because in blogger we cannot use the plugins like WordPress. So many plugins are available in WordPress which makes it easier than blogger. Most bloggers use (foxyform, jotform, 123contactform, etc.) this type of website to create a contact form in their blog.
Today I am going to show you the how to add contact us form in your template as well as in your contact us page.
Also read – How to Create Privacy Policy Page for Blogger?
If you are inserting the code of contact form which is given by a third-party website then no problem at all, but this official contact form is very stunning.
The Benefits to using the Contact Form
- Message sent by the visitor will get you in the minimum interval of time.
- Its interface is official so it will look a beautiful form.
- Your webpage will not take much time to load more slowly.
You can get instant notification from your Blog if someone sent you a message using Contact Form. This is not mandatory to have an official Contact Form to your Blog, but if you add a Contact Form to your Blog, it seems professional. It works to look more attractive. It a lite weight form, don’t think if I add a contact form, it will increase my page load timing.
I have created this tutorial in three parts first part is about adding the contact form gadget. The second is to remove the added contact form gadget and the third one is adding the contact form on any page of your blog.
How to Add/Remove Contact Form Gadget?
Either you can add a contact form on the sidebar or you can add it on the footer of your blog, as you wish. Here I am going to tell, how you can add/remove Contact Form using Gadget? Also, I am going to tell, how you can add the contact form to the Page.
Add Contact Form Gadget
Follow this tutorial to add the Gadget of contact form in a blogger blog.
Step 1 – Go Blogger.com and Log In with your blog where you have added the contact Gadget. If you work on more than one blog then you need to choose the blog where you want to add this Gadget.

Step 2 – Click on the Layout button to get the Gadget button.
In the template, you can add the Contact Form Gadget in the sidebar and in the footer of your template.
Step 3 – You can see the different boxes. You have to click on the link named as “Add a Gadget”.

Step 4 – You have to scroll down in the newly opened pop-up window. When you will see the Contact Form option than simply click on it.
Your form will automatically get its position. You can add the Contact Form at Sidebar and Footer of your Blogger Blog. If you want to remove it, you have to inverse this process. To know the process to remove, read below –
Remove the Contact Form Gadget
Now you are able to add the contact Gadget, now I am going to show you how to remove the Contact Gadget. Here are two methods to remove the Contact Gadget.
First Method
Step 1 – Go to Blogger.com and then go to the “Theme” section from the blogger dashboard.
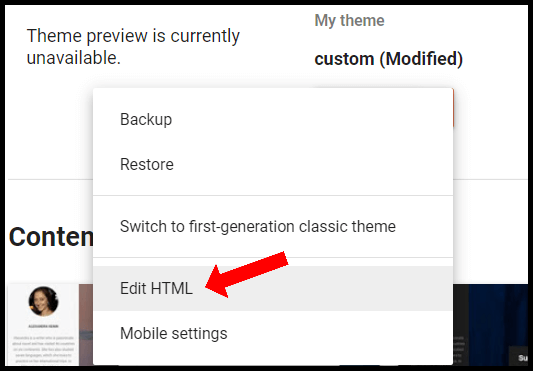
Step 2 – After going to the theme section you have to click on “Edit HTML” option.
Step 3 – In Edit HTML option you have to Search for ]]></b:skin> this code.
Step 4 – Replace the above code with this below one.
div#ContactForm1 {
display: none !important;
}
Step 5 – Now click on the Save Theme button.
Congratulations! It’s done successfully.
Note – Nowadays this above method to remove Contact Form Gadget is not working in Blogger, hence you need to go for the below method.
Second Method
Step 1 – Go to Blogger.com and then go to the Layout section from the blogger dashboard.
Step 2 – Find there the contact form where you added in your “Layout” section.
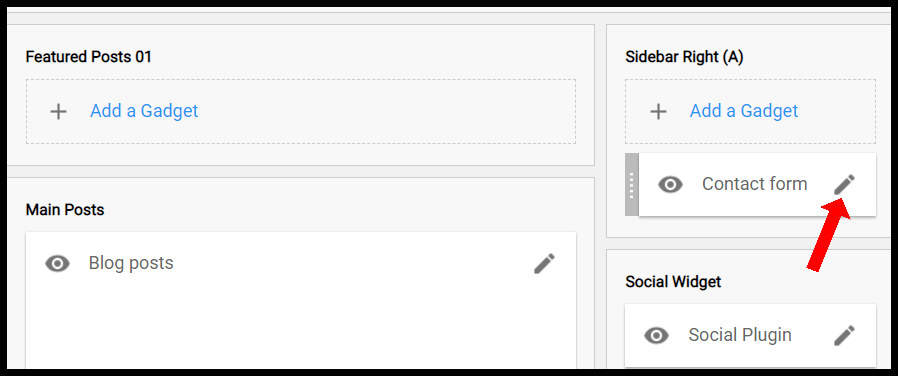
Step 3 – Click on the Pencil symbol. It will open new pop-up window, after clicking.
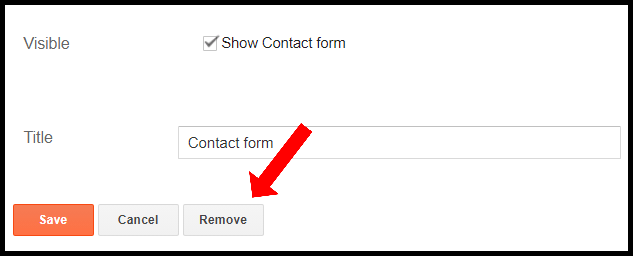
Step 4 – Click on the Remove button.
Congratulations! It’s done successfully again.
Adding Contact Form to a Page
Now I’m showing you a way through which you can add an official contact form to the separate page of your blog.
Step 1 – Go to the “Page” section of your blog. Create a new page (if you already have a page then no need to create a new page)
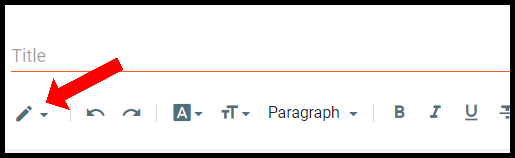
Step 2 – Now come to HTML editor in the post editor
Step 3 – Paste the following code into your HTML post editor.
<div id=”custom_ContactForm1″ class=”widget ContactForm”>
<div class=”contact-form-widget”>
<p>Get in touch with us by filling out the form below.</p>
<div class=”form”>
<form name=”contact-form”>
<p></p>
Name
<br>
<input type=”text” value=”” size=”30″ name=”name” id=”ContactForm1_contact-form-name” class=”contact-form-name”>
<p></p>
Email
<span style=”font-weight: bolder;”>*</span>
<br>
<input type=”text” value=”” size=”30″ name=”email” id=”ContactForm1_contact-form-email” class=”contact-form-email”>
<p></p>
Message
<span style=”font-weight: bolder;”>*</span>
<br>
<textarea rows=”5″ name=”email-message” id=”ContactForm1_contact-form-email-message” cols=”25″ class=”contact-form-email-message”></textarea>
<p></p>
<input type=”button” value=”Send” id=”ContactForm1_contact-form-submit” class=”contact-form-button contact-form-button-submit”>
<p></p>
<div style=”text-align: center; max-width: 222px; width: 100%”>
<p id=”ContactForm1_contact-form-error-message” class=”contact-form-error-message”></p>
<p id=”ContactForm1_contact-form-success-message” class=”contact-form-success-message”></p>
</div>
</form>
</div>
</div>
<div class=”clear”></div>
<span class=”widget-item-control”>
<span class=”item-control blog-admin”>
<a title=”Edit” target=”configContactForm1″ onclick=”return _WidgetManager._PopupConfig(document.getElementById(“ContactForm1″));” href=”//www.blogger.com/rearrange?blogID=1111111111111111111&widgetType=ContactForm&widgetId=ContactForm1&action=editWidget§ionId=sidebar-right-1″ class=”quickedit”>
<img width=”18″ height=”18″ src=”//img1.blogblog.com/img/icon18_wrench_allbkg.png” alt=””>
</a>
</span>
</span>
<div class=”clear”></div>
</div>
Step 3: Add the title to page as you like (exa. Contact us). After this follow the following settings instructions.
Step 4: Now, the whole process is over, only need to click the publish button.
Congratulations! It’s done again.
If someone reader trying to contact you with this official contact form then the message will be received by the admin of the blog. If a blog has two admin, both of them will receive the message.
Over to you
Now you have the whole knowledge of contact forms. You know the two different ways to add it to your blog. If you find any query like no message receiving then I recommend that follow this process from start to end again. If you know the CSS and Javascript then you can optimize it as you want.
If you like this tutorial, please share it. If this tutorial is helpful then please follow us by email or anywhere. If you like this article don’t forget to share it with your friends. If you have any question about it, feel free to ask me.
Thanks for reading.

Is there any Blogger template that has an inbuilt contact form?
Great this contact form is really working